
Hey Folks Android “O” Dev preview is OUT!!!!! – know more

Ready to test your app against Ohh…
Happy coding 🙂
Hey Folks Android “O” Dev preview is OUT!!!!! – know more
Ready to test your app against Ohh…
Happy coding 🙂
Guys, Good News, Java 8 will be supported in Android . read more
Happen to create a custom viewpager for my project . Thought of sharing it in my blog.
…
<RelativeLayout
    android:id="@+id/content"
    android:layout_width="match_parent"
    android:layout_height="wrap_content">

    <au.com.auspost.android.common.view.MiniSlideViewer
        android:id="@+id/mini_slide"
        android:layout_width="match_parent"
        android:layout_height="wrap_content" />
</RelativeLayout>
public class MiniSlideViewer extends RelativeLayout {

    ViewPager viewPager;
    CirclePageIndicator pageIndicator;
    Animation slideUpAnimation;
    SplashScreenPrefs splashScreenPrefs;

    private static final float thresholdOffset = 0.5f;
    private boolean scrollStarted, checkDirection;

    public MiniSlideViewer(Context context) { // passing listview instance just to achieve the animation effect.
        this(context, null);
    }

    public MiniSlideViewer(Context context, AttributeSet attrs) {
        super(context, attrs);
        init(context);
    }

    void init(Context context) {

        inflate(context, R.layout.slide_view_pager, this);
        viewPager = (ViewPager) findViewById(R.id.pager);
        pageIndicator = (CirclePageIndicator) findViewById(R.id.pageIndicator);
        splashScreenPrefs = SplashScreenPrefs.getInstance();
    }

    /**
     * setPageIndicatorFillColor - set page indicator fill color
     *
     * @param fillColor
     */
    public void setPageIndicatorFillColor(int fillColor) {
        pageIndicator.setFillColor(fillColor);
    }

    /**
     * setPageIndicatorPageColor - set Page indicator page color
     *
     * @param pageColor
     */
    public void setPageIndicatorPageColor(int pageColor) {
        pageIndicator.setPageColor(pageColor);
    }

    public void setViewPagerAdapter(MiniSlideAdapter viewPagerAdapter) {
        viewPager.setAdapter(viewPagerAdapter);
        pageIndicator.setViewPager(viewPager);
        TrackingHelper.omnitureDeliveryAddressSlidePageLoad(getContext(), viewPager.getCurrentItem());
    }
}
MiniSlideAdapter.java
public class MiniSlideAdapter extends PagerAdapter {

    private final Context context;
    private static int[] miniViewerBgResources;
    private static int[] miniViewerImageResources;
    private static String[] miniViewerStringResources;

    HideMiniSlidesListener miniSlidesListener;

    /**
     * Callback for Skip click in dae slides .
     */
    public interface HideMiniSlidesListener {
        void onMiniSliderSkipClick();
    }

    public MiniSlideAdapter(Context context, int[] bgResources, int[] imgResources, String[] stringResources) {
        this.context = context;
        miniViewerBgResources = bgResources;
        miniViewerImageResources = imgResources;
        miniViewerStringResources = stringResources;
        miniSlidesListener = (HideMiniSlidesListener) context;
    }

    @Override
    public int getCount() {
        return miniViewerBgResources.length;
    }

    @Override
    public boolean isViewFromObject(View view, Object object) {
        return view == (object);
    }

    @Override
    public Object instantiateItem(ViewGroup container, int position) {

        LayoutInflater inflater = (LayoutInflater) context
                .getSystemService(Context.LAYOUT_INFLATER_SERVICE);

        View view = inflater.inflate(R.layout.slide_page_content, container, false);

        ImageView daeImage = (ImageView) view.findViewById(R.id.slide_image);
        TextView daeInfoText = (TextView) view.findViewById(R.id.slide_label);
        View daeSlide = view.findViewById(R.id.content);
        Button daeSkip = (Button) view.findViewById(R.id.skip);

        //show the skip button only in the last slide.
        if (position == getCount() - 1) {
            daeSkip.setVisibility(View.VISIBLE);
        }

        daeSkip.setOnClickListener(view1 -> miniSlidesListener.onMiniSliderSkipClick());

        daeImage.setImageResource(miniViewerImageResources[position]);
        daeInfoText.setText(miniViewerStringResources[position]);
        daeSlide.setBackgroundColor(ContextCompat.getColor(context, miniViewerBgResources[position]));

        (container).addView(view);

        return view;
    }

    @Override
    public void destroyItem(ViewGroup container, int position, Object object) {
        (container).removeView((LinearLayout) object);
    }
}
All good Now, just invoke in the activity;
final MiniSlideAdapter miniSlideAdapter = new MiniSlideAdapter(this, daeBgResources, daeImageResources, daeStringResources);
miniSlideViewer.setViewPagerAdapter(miniSlideAdapter);
I have passed the array of Images and Strings. Just modify the code as per your needs.
Note: For Page Indicator, I have used PageIndicator library. Refer here
Happy coding 🙂
A small code snippet which makes Integration across the android apps easy.
Try calling a Implicit Intent with the below intent info, you can see yourself that your app is now integrated with the Navigation.
Uri IntentUri = Uri.parse(“google.navigation:q=” + latitude + “,” + longitude);
Intent mapIntent = new Intent(Intent.ACTION_VIEW, IntentUri);
startActivity(mapIntent);
Happy coding 🙂
Hi Guys, many in Java space would have come across the term “Lombok”. For those who are not aware about it, Its a Boiler plate code killer in your model/POJO class. Its been there for a while. It has more to offer. Refer here for more info
reason for me to talk about it is the availability of Lombok as a Android studio plugin. Just install and you are good to go.
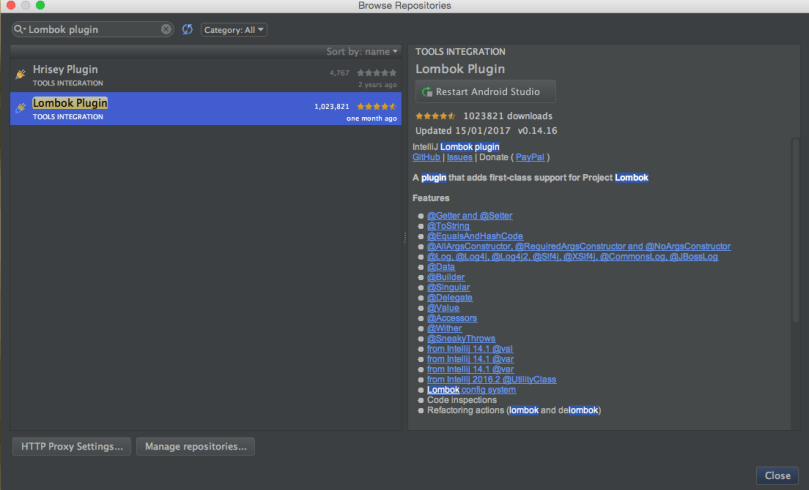
Its makes code look clean and simple to understand. Happy coding 🙂
HI guys, happened to see on Linkedin App, Smart lock dialog; Just wondered what is that?
I found to be a interesting feature particularly for app which want to provide a seamless integration of sign-in for the user who have already saved their credentials in Google chrome. its pretty straight forward to understand. Say in your linkedin app, just Login and chrome might prompt you to save password. On click of save password, chrome stores your credentials. Then you launch your Linked-in app, the credentials info from Chrome is shared to your mobile App and you got to signin automatically. seems magic; that is what smart lock does. Refer for more info
you would be wondering , sharing credentials…is it safe? Even I have no idea whether is safe proof. But I wondered that credentials object just gives password as String. Need to investigate.

To start with , you need to utilize Credentials API . All we need is to save the credentials and then read the credentials. pretty much sharing of credentials from Mobile to Web or vice versa.
Save:
Store user credentials with Auth.CredentialsApi.save():
Auth.CredentialsApi.save(mCredentialsClient, credential).setResultCallback(
  new ResultCallback() {
      @Override
      public void onResult(Status status) {
          if (status.isSuccess()) {
              // Credentials were saved
          } else {
              if (status.hasResolution()) {
                  // Try to resolve the save request. This will prompt the user if
                  // the credential is new.
                  try {
                      status.startResolutionForResult(this, RC_SAVE);
                  } catch (IntentSender.SendIntentException e) {
                      // Could not resolve the request
                  }
              }
          }
      }
  });
Read:
Retrieve stored credentials with Auth.CredentialsApi.request():
Auth.CredentialsApi.request(mCredentialsClient, mCredentialRequest).setResultCallback(
  new ResultCallback() {
      @Override
      public void onResult(CredentialRequestResult credentialRequestResult) {
          if (credentialRequestResult.getStatus().isSuccess()) {
              // Handle successful credential requests
          } else {
              // Handle unsuccessful and incomplete credential requests
          }
      }
  });
Seeing Netflix, Linked in and other major apps are moving towards it. Probably thats the future. Happy coding 🙂
In my previous blog, i have talked about why parcelable is efficient and fast compared to serializable and also said about Android Parcelable plugin, does the auto generate code for your class. Recently I have come across a library which does the parcelable and avoid the boiler plate code such as
writeToParcel, readFromParcel and Parcelable.Creator
One of the issue with these code, you need to write and read in same order. Though not a big deal, but still if we can do better than this, then why not?. Parceler does the Job. No need to write the boiler plate codes and check for the order of read and write.
Refer the Github Link for more info. Parceler
Ok, how its works. Just annote with @Parcel, its does the serialization for you without have to override all the above mentioned code.
compile 'org.parceler:parceler-api:1.1.6'
annotationProcessor 'org.parceler:parceler:1.1.6'
If its throws a error saying “unable to find the generated parcelable class”, it might be due annotationProcessor not enabled for your project. In that case, refer the below.
compile 'org.parceler:parceler-api:1.1.6'
apt 'org.parceler:parceler:1.1.6'
Next step, Just define Parcel Annotation for your class
@org.parceler.Parcel
public class MyParcelClass {

        public String suburb;
        public String state;
        public String postcode;
        public String country;
   }
If suppose you have a Inner class , just do the same as you did to the parent class. Just annotate with @Parcel
@org.parceler.Parcel
public class MyParcelClass {

        public String suburb;
        public String state;
        public String postcode;
        public String country;

        @Parcel
        public static class MyName{
          public String firstname;
          public String LastName;
        }
        @Parcel
        public static class MyID{
          public String DL;
        }

   }
“Be careful not to use private fields when using the default field serialization strategy as it will incur a performance penalty due to reflection.”
To avoid the performance penalty , just define the annotation as
@org.parceler.Parcel(org.parceler.Parcel.Serialization.BEAN)
Till now all Good, But how about Custom serialization? Yes, there is a way to do it.
All you need is to define annotation to the field which you want to do custom serialization.
@ParcelPropertyConverter(NameConverter.class)
public MyName name;
@org.parceler.Parcel
public class NameConverter implements ParcelConverter<MyParcelClass.MyName> {
@Override
public void toParcel(MyParcelClass.MyName input, Parcel parcel) {
if (input == null) {
parcel.writeInt(-1);
} else {
parcel.writeParcelable(Parcels.wrap(input.firstName), 0);
parcel.writeParcelable(Parcels.wrap(input.LastName), 0);
}
}@Override
public LocationPoint.Address fromParcel(Parcel parcel) {MyClassName.MyName name = new MyClassName.MyName();
name.firstName = Parcels.unwrap(parcel.readParcelable(MyFirstName.MyName.class.getClassLoader()));
name.LastName = Parcels.unwrap(parcel.readParcelable(MyFirstName.MyName.class.getClassLoader()));return name;
}
}
There you are; now you don’t need to worry on how to read and write to a parcel class.
Voilla! Happy Coding :)
Hi Friends,
Most of you might be aware about what is deeplink is..but for people who don’t know about it….
In the context of the World Wide Web, deep linking is the use of a hyperlink that links to a specific, generally searchable or indexed, piece of web content on a website (e.g., “http://example.com/path/page”), rather than the website’s home page (e.g., “http://example.com/”).
Google has suggested way to achieve the deeplink of your app from the search result.To make this happen, you might need to add intent filters to the activity in your manifest file.
Below code snippet is form Google developer page. seems pretty easy to use.
The following XML snippet shows how you might specify an intent filter in your manifest for deep linking. The URIs
“example://gizmos”and“http://www.example.com/gizmos”both resolve to this activity.<activity android:name="com.example.android.GizmosActivity" android:label="@string/title_gizmos" > <intent-filter android:label="@string/filter_title_viewgizmos"> <action android:name="android.intent.action.VIEW" /> <category android:name="android.intent.category.DEFAULT" /> <category android:name="android.intent.category.BROWSABLE" /> <!-- Accepts URIs that begin with "http://www.example.com/gizmos” --> <data android:scheme="http" android:host="www.example.com" android:pathPrefix="/gizmos" /> <!-- note that the leading "/" is required for pathPrefix--> <!-- Accepts URIs that begin with "example://gizmos” --> <data android:scheme="example" android:host="gizmos" /> </intent-filter> </activity>
What happens if you want the same activity to handle different deeplink Url. Simple add more intent filters. But it made my manifest look huge and if you are working on big enterprise app, probably you might need to add lot of intent filters. I was looking for a library which does all these hardwork , easy to extend and yet make the manifest look simple. Fortunately, there is a saver. airbnb has a fantastic library which helps me to achieve my goal. easy to use, code looks simple and neat. Thanks to airbnb DeepLinkDispatch. refer the github link for more info.
The most important thing i was looking on how ease to add multiple deeplink url’s
Single Deeplinks
@DeepLink("foo://example.com/deepLink/{id}")
public class MainActivity extends Activity {
  @Override protected void onCreate(Bundle savedInstanceState) {
    super.onCreate(savedInstanceState);
    Intent intent = getIntent();
    if (intent.getBooleanExtra(DeepLink.IS_DEEP_LINK, false)) {
      Bundle parameters = intent.getExtras();
      String idString = parameters.getString("id");
      // Do something with the ID...
    }
    ...
  }
}
Multiple Deeplinks
@DeepLink({"foo://example.com/deepLink/{id}",
"foo://example.com/anotherDeepLink"})
public class MainActivity extends Activity {
  @Override protected void onCreate(Bundle savedInstanceState) {
    super.onCreate(savedInstanceState);
    Intent intent = getIntent();
    if (intent.getBooleanExtra(DeepLink.IS_DEEP_LINK, false)) {
      Bundle parameters = intent.getExtras();
      String idString = parameters.getString("id");
      // Do something with the ID...
    }
    ...
  }
}
Query parameter
Query parameters are parsed and passed along automatically, and are retrievable like any other parameter. For example, we could retrieve the query parameter passed along in the URI
example://example.com/deepLink?qp=123:@DeepLink("foo://example.com/deepLink") public class MainActivity extends Activity { @Override protected void onCreate(Bundle savedInstanceState) { super.onCreate(savedInstanceState); Intent intent = getIntent(); if (intent.getBooleanExtra(DeepLink.IS_DEEP_LINK, false)) { Bundle parameters = intent.getExtras(); if (parameters != null && parameters.getString("qp") != null) { String queryParameter = parameters.getString("qp"); // Do something with the query parameter... } } } }
Refer the github for more information. Thanks airbnb. Happy coding 🙂
Guys, today updated the android auto and surprised to see its now a standalone app. No need to buy a new car or a expensive car head unit to support android auto. Welcome to Android world.

Info reg your project update or creating a new project to support Android N devices.
Create New Project:
- Click File > New Project. and follow the steps until you reach the Target Android Devices page.
- On this page, select the Phone and Tablet check box.
- Under Phone and Tablet option, in the Minimum SDK option list, select API 25: Android 7.1 Preview.
Update existing Project:
open build.gradle files to update your project to support Android N
android {
  compileSdkVersion 25
  buildToolsVersion '25.0.0'
  ...

  defaultConfig {
     targetSdkVersion 25
     ...
  }
  ...
}
More detail info refer Developer Android set up Android N7.1
Happy coding 🙂
